Becoming Familiar with Maintenance and Data Entry Windows
Throughout the software, maintenance and data entry windows share a common set of controls which make learning the software quick and easy. Before you begin entering data and performing common tasks, let's look at examples of these windows.
Note: The task windows appearance will vary depending on which theme is selected in Company Maintenance, but the functionality is the same.
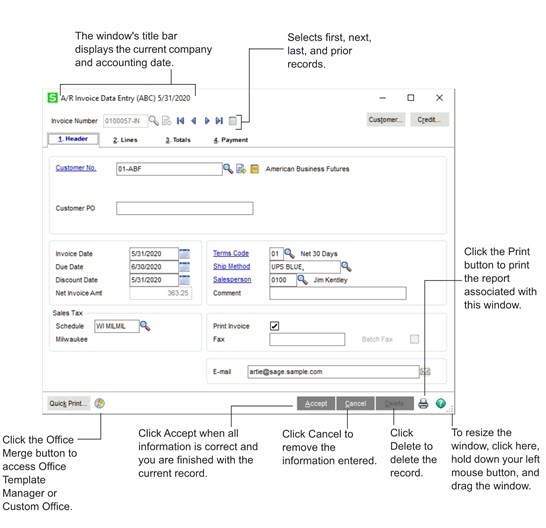
Sample Maintenance and Data Entry Window
This sample window shows common data entry features shared by maintenance and data entry windows. Some features may not appear in all windows.
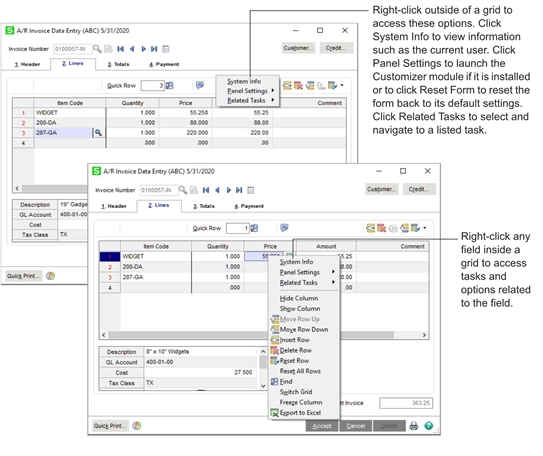
Sample Accounts Receivable Line Entry Window
This sample Accounts Receivable Lines tab window shows common grid entry features shared by data entry windows in modules other than Material Requirements Planning and Work Order.
In addition to the features illustrated below, you can personalize a data entry grid to allow for fast and efficient entry of data. Most columns in a grid can be moved, resized, or hidden. You can also freeze a column of data so that a particular column remains in view during scrolling. You can resize the data entry window, and the Primary and Secondary grids as well. All personalizations to grids are saved for your future data entry sessions.

Another feature of data entry windows in modules other than Material Requirements Planning and Work Order is the right-click menu.
-
Right-click outside of a grid to access system information and other tasks.
-
Right-click any field in a grid to access additional tasks related to the field.
Understanding Basic Types of Data
During data entry, you may need to enter the following basic types of data.
-
Text: Unformatted entries of alphabetical information (for example, names, addresses, and comments) are text entries.
-
-
Enter a two-digit month (MM), followed by a two-digit day (DD), followed by either a two-digit (YY) or four-digit year (YYYY). Six or eight characters can be entered for the date. If a two-digit year is entered, the century is determined by the century preferences setting in the Windows Control Panel.
-
You do not need to put a hyphen (-) or slash (/) between the day, month, and year; punctuation is inserted automatically. For example, to enter May 31, 2010 at a data field, type 053110. (Do not forget the leading zero.)
Note: The M/d/yyyy format is the default date display format. The format of the date is set from the Windows Control Panel.
-
-
-
Empty numeric fields (zero value) display a mask indicating the number of digits that can be entered to the right of the decimal point. For example, .00 appears if the numeric field accepts two-decimal precision.
-
Some numeric fields (for example, quantity and hour fields) do not assume the decimal point.
-
To enter negative numbers, type the negative sign (-) as either the first or the last character of the entry.
-
-
-
General ledger account numbers are structured fields consisting of one or more segments separated by a hyphen (-) or other separator selected at the Account Number Separator field in Account Structure Maintenance.
-
You can enter the value for each segment separated by a hyphen (-). You can also zero, or blank fill, each segment to its maximum number of characters without using the hyphen (-).
-
Example: An account field with a mask of #####-##-###-###-### processes your entry in the following manner.
Your Entry... Displays As...
1-2-4-6-800 00001-02-004-006-800
1234567891234567 12345-67-891-234-567
010005 01000-05-000-000-000
-
Sorting and Selecting Dialog Box Data
You can sort data in columns in ascending or descending order by clicking the column heading. Click a column heading to sort the data in reverse order. Resize the column headings by clicking and dragging between the columns.
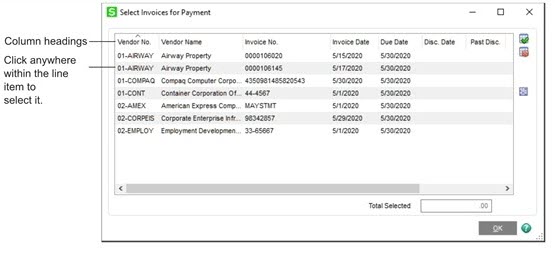
You can use the UP ARROW and DOWN ARROW keys to select line items. To select more than one line item, press the CTRL key and click the items. To select a range of items, press the SHIFT key, click the first item, and then click the last item in the range.
Using the Lookup Feature
When entering data in a maintenance or data entry window, you can click the Lookup button ( )at certain fields to display a list of records. You can then select the appropriate record.
The Lookup feature contains options that allow you to filter and customize the search criteria, and create up to 99 custom lookup views. In addition, you can print the list of records appearing in the lookup list box. The illustration below shows a lookup window. For more information on using Lookups, see the following:
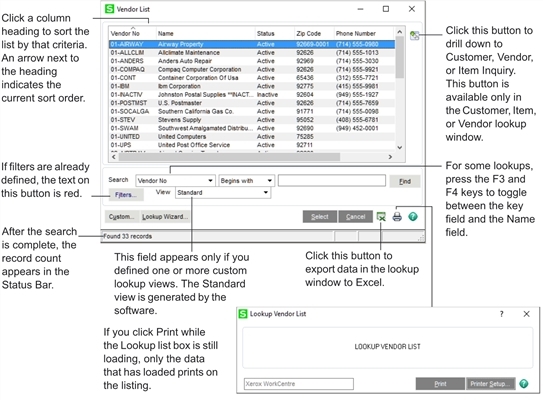
Note: The title of the lookup window reflects the name of the field at which you clicked the Lookup button.
In some cases you may click the lookup button, and no records appear in the lookup window. This could happen for the following reasons:
-
The number of records is over the limit set at the Lookup Limit for Initial Display field in User Maintenance.
-
The Initial Display check box on the fifth User Lookup Wizard page is cleared. For more information, see User Lookup Wizard in the Help system.
-
A custom filter that has no result set is in effect.
To display records, filter the information by using the Search, Operand, and Value fields, and then click .
Navigating with Common Buttons, Icons, and Keystrokes
All maintenance and data entry windows share the same set of buttons and keystrokes to help you navigate through data and perform common tasks. If you prefer to use the keyboard while you work, most buttons have keyboard equivalents.
For a list of common buttons and their keyboard shortcuts, see the Keyboard and Button Navigation article in the Sage 100 help.