
Using AZCopy to copy data
We recommend using the AZCopy utility to copy data files from the source system to the target system in the cloud. The utility is optimized for performance and can restart and recover from a failed data transfer.
Note: The layout of information in the Microsoft Azure portal will change as Microsoft releases updates. Use the search field to find buttons or fields that have moved.
Create a storage account in Azure
- Log into your Microsoft Azure Portal.
-
Create a new storage account:
- If necessary, select your subscription.
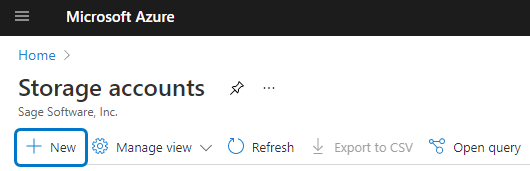
- Under Azure services, click Storage accounts.

Note: If you don't see the Storage accounts button, type Storage accounts in the search field.
- Click New or, if you already have another storage account, click Add.
- Under the Resource group field, click Create new and enter a name for the resource group.
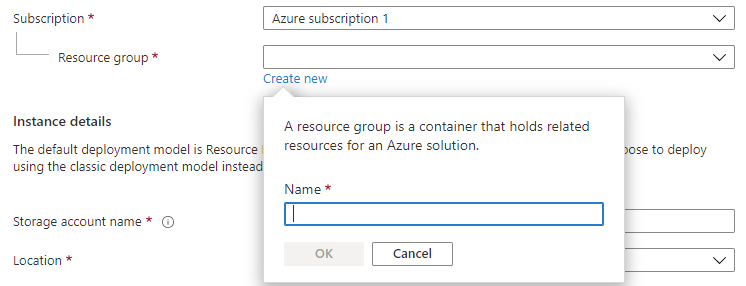
- Enter a storage account name.
- Select any location.
- Click Next: Networking.
- In the Connectivity method area, select the Public endpoint (all networks) option.
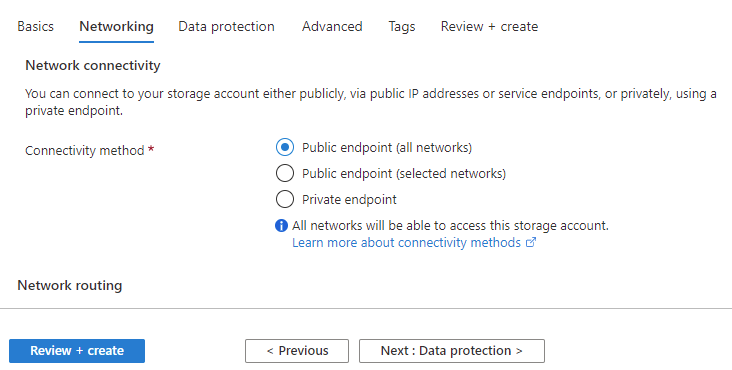
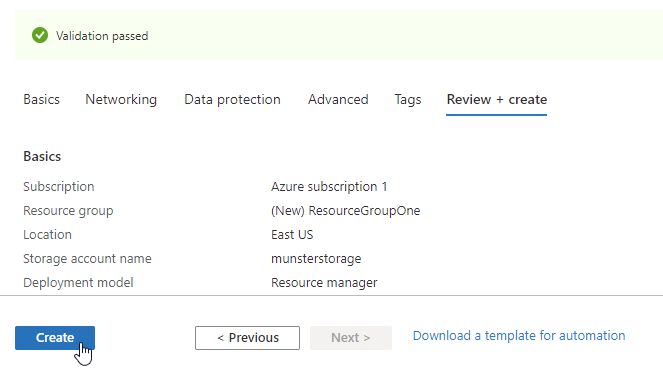
- Click Review + Create.
- When you see the "Validation passed" message, click Create.
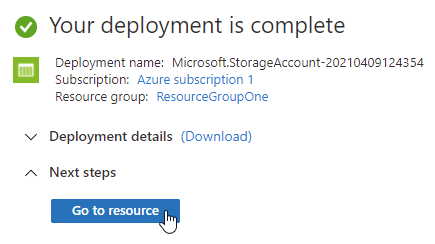
-
When you receive the message letting you know that the deployment was successful, click Go to resource.
-
Grant access to the storage account by setting up a shared access signature (SAS):
- On the left side of the screen, click Shared access signature.
-
Under Allowed services, select the following check boxes:
- Blob
- File

- Under Allowed resource types, select the Container check box.
- Under Allowed permissions, select the Write check box and any other permissions that you want to allow.
- Under Start and expiry date/time, in the End field, enter an expiration date for the access key. For security purposes be sure the date is no further in the future than what is needed to complete the migration.
- Under Allowed protocols, select the HTTPS only option.
- Click Generate SAS and connection string.
- Copy the SAS token to a Notepad file or other location for later use.
Important! You must make note of the SAS token before leaving the setup page; otherwise, you will have to generate a new one.
Create a container in the storage account
This container will be used for the file transfer.
- On the left side of the screen, click Overview to return to the storage account information page.
- Click the Containers tile.
-
Click the New containers button.

- Enter a name for the container and then click Create.
Upload the source MAS90 folder into the Azure storage account
- On the computer where your source MAS90 folder is located, download AzCopy V10 from the Microsoft website.
- Create a new folder: C:\Sage\utils
- Extract the file in the utils folder created in the previous step.
- Open a text editor, such as Notepad, and copy the following text into the file. (You'll then replace the sections that are highlighted in the next step.)
@REM =========================================================================
@REM Location of AzCopy v10
@set AZCOPY="<Path-to-AZCOPY-V10>"
@REM =========================================================================
@REM lowercase letter and numbers only
@set AZAccount="<StorageAccount>"
@REM **** The SAS Token - make sure to add % before each % so you end up with %%
@set SASToken="<SAS-Token>"
@REM =========================================================================
@REM -------------------------------------------------------------------------
@set sourceDir="<SourceFolder>"
@REM lowercase letter and numbers only
@set AZContainer="<BLOB-Container>"
@REM -------------------------------------------------------------------------
@echo Copy Folder Contents to Azure Blob Storage
@echo Source folder: %sourceDir%
@echo Azure Storage Account: %AZAccount%
@echo Azure Storage Container: %AZContainer%
%AZCOPY% copy %sourceDir% https://%AZAccount%.blob.core.windows.net/%AZContainer%/%SASToken% --recursive --from-to=LocalBlob
:DONE
ECHO Done.
PAUSE
exit 0
- Replace the highlighted values:
- <Path-to-AZCOPY-V10>: Replace with the full path to the azcopy.exe file.
Example: C:\Sage\utils\azcopy-10.9.0\azcopy.exe
- <StorageAccount>: Replace with the name of the storage account that you setup in Azure.
- <SAS-Token>: Replace with the SAS token generated when you set up the storage account in Azure.
After copying the SAS token, add a percent symbol (%) before each existing percent symbol. For example: %%sastoken%%
- <SourceFolder>: Replace with the full path to the source MAS90 folder that you are migrating data from.
- <Blob-Container>: Relace with the name of the container created in Azure Blob storage. This container is where the MAS90 files will be copied.
- <Path-to-AZCOPY-V10>: Replace with the full path to the azcopy.exe file.
- Save the file using a batch (.bat) file extension. For example: filename.bat
- Run the .bat file that you created.
The MAS90 folder is uploaded to the Azure Blob storage.
Download the MAS90 folder from the storage account to site
- Go to the Sage Partner Cloud site that you provisioned and connect using the Virtual Machine Access option.
- Download the latest version of AzCopy version 10 from the Microsoft website.
- Create a new folder: C:\Sage\utils
- Extract the file in the utils folder created in the previous step.
-
Open Notepad and copy the following text into the file. (You'll then replace the sections that are highlighted in the next step.)
@REM =========================================================================
@REM Location of AzCopy v10
@set AZCOPY="<Path-to-AZCOPY-V10>"
@REM
@REM Adjust TRANSFER CAP for slower internet connections (in megabits per second); 0 for no cap
@set AZCAP="0"
@REM =========================================================================
@REM =========================================================================
@REM lowercase letter and numbers only
@set AZAccount="<StorageAccount>"
@REM **** The SAS Token - make sure to add % before each % so you end up with %%
@set SASToken="<SAS-Token>"
@REM =========================================================================
@REM Change location to local folder for the build downloads
@REM -------------------------------------------------------------------------
@set LocalDestFolder="<DestinationFolder>"
@REM lowercase letter and numbers only
@set AZContainer="<BLOB-Container>"
@REM -------------------------------------------------------------------------
@echo Download from Azure Blob Storage to Local Folder
@echo Destination folder: %LocalDestFolder%
@echo Azure Storage Account: %AZAccount%
@echo Azure Storage Container: %AZContainer%
@%AZCOPY% cp https://%AZAccount%.blob.core.windows.net/%AZContainer%/*%SASToken% %LocalDestFolder% --recursive=true --cap-mbps %AZCAP%
@REM Pause is here to see the results of the copy in the command window
@PAUSE
- Replace the highlighted values:
- <Path-to-AZCOPY-V10>: Replace with the full path to the location of the the AZcopy file.
Example: C:\Sage\utils\azcopy-10.9.0\azcopy.exe
- <StorageAccount>: Replace with the name of the storage account that you setup in Azure.
- <SAS-Token>: Replace with the SAS token generated after setting up the storage account in Azure.
After copying the SAS token, add a percent symbol (%) before each existing percent symbol. For example: %%sastoken%%
- <DestinationFolder>: Replace with the path to the folder in which the data will be saved.
- <BLOB-Container>: Replace with the name of the container in Azure Blob storage, which should now contain the data.
- <Path-to-AZCOPY-V10>: Replace with the full path to the location of the the AZcopy file.
- Save the file with a batch (.bat) file extension. For example: filename.bat
- Run the .bat file that you created.
The MAS90 folder is downloaded from Azure to the Sage Partner Cloud site.